Over the years Microsoft Word has played a key role in our professional lives. It is pretty much our go-to application every time we want to prepare an article or a proposal of any sort. Similarly, it has a fair share of programmers depending on it as their primary IDE (Integrated Development Environment).
One of the most useful features in Microsoft Word, or any text editing application, is the autocorrect, but that can get a tad bit annoying at times. Sometimes, you repeatedly mention words that aren’t a part of Word’s dictionary or write a line of code where the objects aren’t identified as legitimate English words. Thus, today we will be showing you how you can add or remove words from the Microsoft Word Dictionary.
I can’t fathom the countless times I have been saved from the embarrassment of foolish typing errors just because of the autocorrect feature, but in cases where the words we intend to type aren’t a part of the dictionary, those red lines that appear under them can both be annoying and make your work look untidy. On the flip side, it’s possible for you to mistakenly add a word to the MS Word dictionary, meaning that each time you type that work thereon out, it won’t be corrected. This guide will help you out with both these issues.
While this guide was centered around Microsoft Word, Microsoft has kept a unique UI across the various utilities of its Office Suite, so you can find similar steps to make these tweaks in other Office applications like Excel, PowerPoint, Outlook too.
Add or remove words from Microsoft Word Dictionary
You have the following ways using which you can add or remove words from Microsoft Word Dictionary:
- Using the Word context menu
- From the DEFAULT.dic dictionary file
- Using the Custom Dictionaries dialog box
1] Using the Word context menu
This is pretty much the most basic and elementary way to get the job done. All you have to do here is open Microsoft Word and type out the word that you want to add to the dictionary.
If it isn’t already a part of it, you’ll find a red line below it. Right-click on the word and from the context menu, select ‘Add to dictionary.’ If this option is greyed out on your end, you will have to enable the Custom Dictionaries option. Here is how that can be done.
Click on the File option from the menu up top. From the panel of settings on the left, click on ‘Options’. This is going to open the Word Options window.
Here, select proofing from the left side and further click on Custom Dictionaries. You will now see a separate Custom Dictionaries window.
Under Dictionary List, checkmark CUSTOM.dic. This will enable the Change Default option which would, otherwise, be greyed out. Click on that and from the Dictionary Language drop-down, select All Languages. Save these settings by clicking on Ok and exit the window. You will now be able to add words to the MS Word dictionary using the context menu.
Read: How to link PPT or PDF objects in Word document.
2] From the DEFAULT.dic dictionary file
The DEFAULT.dic file is a directory of all the words that you have added manually to your dictionary. It, too, can be modified to make space for more words.
Open the Run command by pressing the Windows + ‘R’ key combination. In the command line box, copy and paste the following path.
%AppData%\Microsoft\Spelling\en-US
You can, alternatively, open your File Manager and paste the path there.
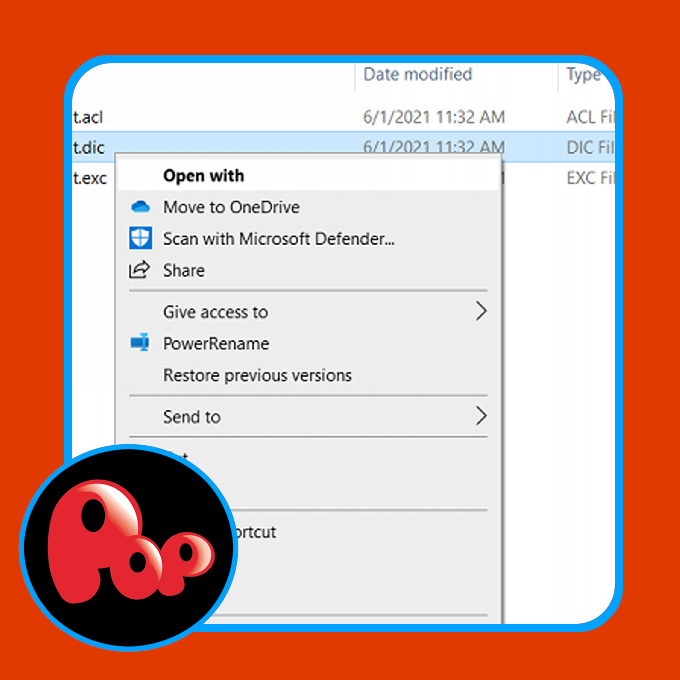
This will take you to a folder named Spelling, where you will see three files. We have to work with the DEFAULT.dic file. Unfortunately, there is no standard application that can open ‘.dic’ extension files, so we will be making use of Notepad.
Right-click on the DEFAULT.dic file and click on Open With. It would then show a list of apps you can open ‘.dic’ files with, which would normally be empty. So, click on ‘More Apps’, and from the list that is subsequently shown select Notepad.
This will open a Notepad file with the words ‘#LID 1033’ in its first line. All you have to do now is simply add words you want to be a part of the dictionary to this notepad file. If you have to delete a word from your system’s dictionary, simply delete it from this document.
Keep in mind that you should only input one word per line. A sample file looks like this:
Save the file and you can now observe these newly added words to not show a red line below them.
3] Using the Custom Dictionaries dialog box
If you remember, we opened the Custom Dictionaries dialog box to enable the Add to Dictionary feature earlier on. You can use this dialog box to add words of your choice to the dictionary too.
Open MS Word and from the Top Menu, click on File. From the settings and show up on the left-side pane, select Options.
Click on Proofing and further select Custom Dictionaries. In the Custom Dictionaries window, click on CUSTOM.dic, or any dictionary of your choice, and further click on Edit Word List.
Under the Word(s) option, type the words that you wish to be a part of your dictionary and click on Add to save that. Words using this method can be added one by one, so repeat the process and close the window once you are done.
All the words that you have added, now or previously, will appear under the Dictionary. If you want to delete a word, simply click on it and select Delete.
We hope that this guide was able to satisfactorily answer your queries on how to add or remove words from your MS Word Dictionary.
Related: How to add a custom dictionary in Word, Excel, and Outlook.